 |
Happy Bunnies! - click to enlarge
- more pictures at foot of page - |
What a fantastic day we all had yesterday with our 4th annual
Hive Building Day! Each year this proves to be a really fun event but yesterday surpassed even the others. When mopping up afterwards Peter concluded that we had built
20 x 3 box Warré hives - what a feat! Our heartfelt thanks go to Pete for all the hard work he put in preparing the flat packs - didn't he do well? Now all we need are 20 prime swarms!

Having woken this morning to howling gales and torrential rain - were't we lucky with the weather? Granted it was a bit parky yesterday, but had it have been warmer I'm sure there would have been more slaking and less work - at least everyone kept busy to stay warm!

Now it's over to you to........
....complete your Warré hive
1. Treating the OUTSIDE of your hive
Your hive has been made from untreated pine. This is good as it means the bees have an uncontaminated surface - most wood is treated with anti-insect chemicals to mitigate against wood boring beetle and fungal growth. The down side is that it will need to be treated externally to prevent it soaking up the rain, rotting and warping.
Some natural beek's use a linseed oil and bees wax mix. This makes a fine bee-friendly coating, but is difficult to source and mix, hard to apply & dry and needs re-coating annually. The wrong type of linseed oil can also result in issues.
The easy option therefore is to use a 'plant/insect friendly' wood treatment. The best is possibly
Life Time Wood Treatment, though given it's the outside of a hive and you don't have bees yet a better quality fence treatment fits the bill as do some good exterior emulsions. Although the latter often contain fungal inhibitors I have not found them to cause problems - after all you are only using then to coat the
outside of the hive. The important thing for you now is to get a couple of coats on before placing the hive outside
then you should place it outside to 'weather' i.e. allow any chemicals and scents to leech off and dry out. I'd recommend that you do this job first.
2. Treating the INSIDE of your hive
As said above your hive has been made from new untreated timber - most beek's would leave the inside of their hives untreated. I too recommend this.
For completeness I should point out, however, that there is a developing school of thought that the inside
can be coated with a natural tree resin mix. The main advantage of this being to attract swarms to a brand new hive as bees prefer a cavity that's been used before and this mix is thought to replicate the bees natural propolis wall coating. Details can be found here, but I would suggest that as this is 'experimental' you run with the tried and tested method of leaving it untreated and play once you get some more experience.
3. Adding the Entrance
The only digression we made from Warré's original plans was to add a
sump floor. This has several advantages over his original design, though, in fairness to him, we must not forget that in the era he developed this hive (c.1920) bees were not under the intense pressure that our 21st century bees now suffer. The sump floor has the following advantages:
- it better replicates a natural tree cavity where the entrance is low down in the cavity but not on the floor - it's the way a tree rots when a branch dies,
- it allows us to create a sawdust floor to encourage a microbial/insect ecosystem in balance with and complimenting the bees,
- It provides easy access for for bottom feeder tray should you need to feed your bees back some of their honey should in the future you find you have cropped too much,
- it allows you to insert a varroa screen and tray should you wish to monitor the varroa drop.
The sump floor had no entrance cut, it is your choice whether you have a Warré style oblong entrance slot or a circular hole.
 |
| click image to enlarge |
- To cut a Warré slot use a jig saw to cut a 120mm wide by 10mm deep slot in the top centre of your sump floor at the top. When the bee box is added above this gives you a rectangular letterbox entrance.
- To add a circular entrance use a 25mm hole cutter to make a hole, again in the centre towards the top of the box - see photo aside. For those of you with no opinion as to which entrance to use I personally favour the round entrance
hole as, again, it better replicates a natural tree cavity - the honeybees evolutionary home. A 25mm entrance is a large space for a new colony to defend so I cut a 20mm hole in a small piece of wood and screw this over my 25mm hole - see photo. The resulting conical entrance provides a better space for guard bees to defend.
- Should you not have a jig saw or hole cutter please feel free to bring your entrance back at a future meeting as I have the requisite tools and will gladly assist.
4. Adding the landing board
Pete supplied a landing board pre-cut to shape to allow rain to drain off - make sure you add it the right way around! Please be clear that a landing board is not necessary for the bees, they are quite happy flying straight in or landing on the side wall. However, if you add one it will be used by the bees and it makes a perfect backcloth for viewing of photographing them, especially if painted a light colour. It also helps show the health of your colony as it makes it easier to see dysentery droppings and other detritus the bees throw out of their hive. In fact I would also recommend adding a stone or paving slab in front of your hive to further assist this. If you have more than one hive in close proximity you can also paint their entrances different colours to help the bees identify their hive as they do use colours and patterns to home in on.
To add the landing board drill 1 or 2 holes the length of the landing board (front to back) and screw it to the hive
from the outside - see photo above. Don't glue it. This way it can easily be removed to repaint it when it inevitably gets grubby. Repainting in situ will result in your guard bees getting covered in paint and probably dying when they come out to find out what's going on!

5. Waxing your top bars
With a Warré hive it is not critically important to the beekeeper that the bees build straight comb (unlike in a horizontal Top Bar Hive!) though it's helpful if you get a disease visit from your regional
bee inspector. It is not therefore absolutely necessary wax the bars - i.e. add a line of reliably sourced bees wax to the bars to encourage them to build straight.
However, Bernhard, a German Warré beekeeper whose opinion I very much respect suggests that we add 4mm deep waxed strips to maximise the usable brood comb in a box (further details
here) so I suggest you do this if you can source the wax. An easy way to achieve this is to collect the wooden coffee stirers from coffee shops and stick these to the
underside centre of your bars - see photo. Buy a block of bees wax from a reliable source (I personally trust the local commercial beek' who has a stall in the farmer's market held in the village hall next door to us on
YABeeP meeting days) and rub this on the shims you stuck on.
 |
| Wax starters, courtesy of Starbucks! |
6. Adding the bee-proof barrier
A bee-barrier needs to be placed in your hive between the bee area and the quilt box to stop the bees nibbling their way upwards and showering the hive with sawdust - not a pretty sight and a problenm for the bees! This barrier is made from hessian cloth and a flour/water mix - remember making papier-mâché as a kid?

To do this take
just one of your bee boxes with the top bars in place, this will become your top box. Cut a single sheet of hessian cloth to fit the top of the box plus about a 1" overlap . Paint a flour/water paste onto the top bars and top sides of the box. Place the cut hessian sheet which you have already soaked in this flour/water mix on top of the box and bars then brush it down with more paste. Set it aside to thoroughly dry, preferably in the sun. When dry it will become like hard cardboard. Trim off the excess around the top of the box and you're done.
Locally
Tinknells Country Store with branches around the region sells empty hessian sand bags for filling at £0.85 each. Perfect for 2 Warré hives.
Please make sure that you thoroughly wash any hessian you use as it's often coated with poisons to stop mice and moth eating through to the contents. I'd even do this with new hessian.
7. Adding the quilt floor
You also need to add a hessian cloth floor to the quilt box - I'm not sure why it's called a 'box' as it's got no top and bottom; it's really a frame or tray. To make this it is just a simple matter of pulling a sheet of hessian taut over the quilt frame you built, neatly folding it up the outside and attaching it with staples, tacks or glue -
see photo in this link. You need to do a neat job of the corner folds, hospital corners being recommended, as it needs to fit under your roof a' untidy folds will catch. You do not need to flour/water paste this as the bees are prevented from reaching this by the bee-proof barrier below.
 |
You can tie the
boxes together as one unit |
Now fill the resulting 'tray' with sawdust, leaves, wool or other clean
natural material to act as the quilt for your hive.
Take great care that whatever you use for filling is pesticide and chemical free. I know of cases where impregnated materials have been used and consequently killed the colony, eg wool where the sheep had been 'dipped' prior to sheering, eco-friendly chicken bedding with anit-mite additive, etc. Take great care as you don't want to kill your brand new bees! I personally recommend animal grade sawdust -
YABeePers are welcome to collect some from me which I use as chicken bedding.
8. Securing your hive
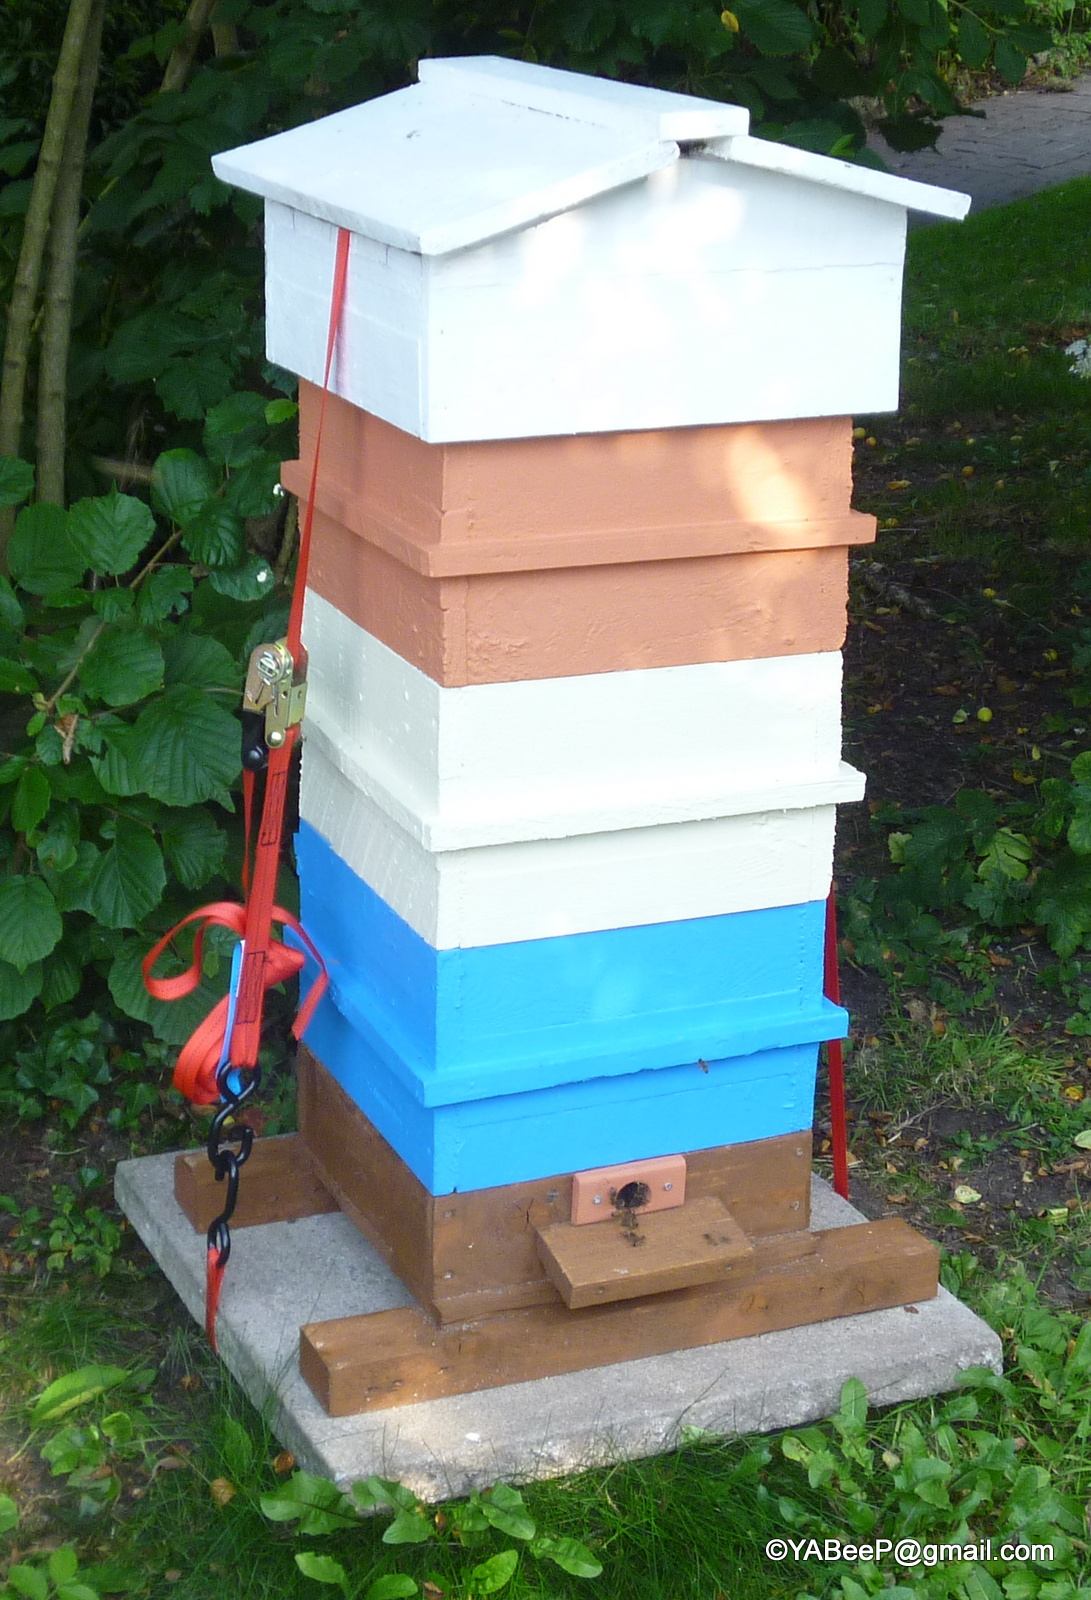
You can use a ratchet strap to tie the boxes together as one unit. That way, if it does get knocked over it should not fall apart - see photo. I would recommend that you don't use the really cheap pound shop straps as the webbing on these rots in just a few months making them useless.
 |
Rock-steady security - wider
foot-print plus strapped to a heavy slab |
For extra security, especially if the hive might get knocked or subject to high wind, you can place it on a paving slab and tie the ratchet strap around that as well so the slab acts as a base weight. Alternatively use a couple of steaks in the ground either side (you can use the
corkscrew dog anchors - see photo below) and strap the hive to those.
For rock-steady security you can additionally widen the footprint by screwing the base of the sump box to a wider piece of wood or two planks - see photo.
 |
For a cheaper option tie it
down to dog lead anchors |
9. Siting your hive - the correct location
Bees evolved living in deciduous woodlands so are accustomed to dappled shade. Modern beekeepers often place them in full sun to force them to work harder; they will fly earlier and retire later if in direct sun, but you have to ask yourself if this is good for them?
See this page for a discussion on this.
Place your hive where you will have access all around it. When you have to lift it in the spring or do your autumn manipulations you will need room to move. You may also need to fit a hive lift behind it and/or accommodate a helper as a hive full of honey and stores is very heavy!
If it is in a garden which will have other human traffic then face the entrance towards a hedge, fence or similar about 1 or 2 meters away from it. The bees will then be forced up over head level by the barrier. Bee traffic behind the hive is very minimal so unsuited passers by can happily move too an frow behind the hive.
Do not place your hive where cattle (cows, sheep, goats, etc.) can reach it as they will knock it over - to them it makes an excellent scratching post! If in a field with animals ensure that you securely fence it off. Similarly, make sure that your hive is away from public view. You'd be amazed what a great target it makes for stone-throwing vandals. Similarly, many members of the public (and your neighbours!) may be irrationally scared of bees. 'Out of sight, out of mind' is always a healthy bee keeping policy.
If you have further questions please ask your assigned mentor or raise the issue at a
YABeeP meeting.
Robin Morris
YABeeP
PS: Don't forget that my recommended reading for all Warré beek's is:
- 'Beekeeping for All' (book/web) - written by Abbé Emile Warré himself . This book, translated into English by Patricia and David Heaf, can either be bought as a published print edition (link) or downloaded as a free pdf download (8,660 KB).
- The Buzz about Bees: Biology of a Superorganism (book) by Jürgen Tautz. An absolutely brilliant book about bees, not beekeeping. Both informative and great photos. Amazon link.
- The Bee-Friendly Beekeeper - Dr. David Heaf (book) available from bookshops or direct from the publisher here.
~~~~~~~~~~~~~~~~~~~~~
Photo's from yesterday's party! Click photos to enlarge.
 |
| Pete gets 'em going! |
 |
| Stop smiling and get on with your work! |
 |
| I spy some dodgy deals taking place |
 |
| What do you expect when knocked-off goods are sold from the back of a van? |
 |
| Caught in the act |
 |
| Oil change sir? |
 |
| No, that one! |
 |
| Ray, the banger man |
 |
| You've heard of a bugger's muddle; well here's a bugger's huddle |
 |
| The Crazy Gang |
What a great day.................
.....and the last word's Peter was heard to mutter as he drove off at the end of the day was "Well, I suppose if others want to do another later in the year I'd be up for it." Famous last words......
 |
| Photo - Annie Webster |
 |
| Photo - Annie Webster
|
 |
| Photo - Annie Webster
|




 Posts
Posts


